Whether you’re using Excellentable, or another spreadsheet software in Confluence, there are certain best practices you can follow to ensure your spreadsheets are accurate, easy to read, and effective. With Excellentable: the confluence excel spreadsheets you can create a centralized location for your spreadsheets, track changes and updates in real-time, and easily share your work with your team. In this blog, we’ll cover planning, conditional formatting, data validation, and creating an awesome overall look and feel.
Plan your spreadsheets
Let’s face it, a good spreadsheet isn’t created just once. If your spreadsheet is good, your colleagues or boss will ask you to create it again, and even draw comparisons from the last time around as well.
- Plan your spreadsheet upfront: You should budget some time to identify and columns that you need in the spreadsheets, and what rows and columns will be required if you need to create the same spreadsheet next week/month.
- Avoid nesting formulas: Nesting complex formulas are undesirable for two reasons. First, your colleagues will ask you to explain/simplify the formula multiple times. Second, it becomes hard to rectify a mistake. It’s better to de-nest using two cells and split the formula.
- Use explainer sheet in multi-sheets: If you have a lot of sheets in your .xlsx, create one more spreadsheet at the beginning that explains what the rest of the spreadsheets are for.
Use Versioning
Everyone has at least one spreadsheet horror story: something like you completed the work, but forgot to save the data. While Excellentable stores data in drafts, it is also important to use save at multiple points in your work. This allows you to go back to a previous version at any time.
Some of the best points to save a spreadsheet (and create a version) are:
- After finally cracking a complex formula
- After finishing work within a sheet
- After applying a filter the will be used multiple times.
Conditional Formatting
Conditional formatting is the process of formatting cells based on certain conditions. Here are some best practices for using conditional formatting in your spreadsheets:
- Use colors sparingly: Use colors sparingly and consistently to avoid overwhelming the user. Stick to a limited color palette and use colors to highlight important information or to draw attention to specific cells.
- Use icons: Use icons to convey information visually. For example, you might use a green checkmark to indicate that a task is complete or a red exclamation point to indicate that there is an error.
- Use conditional formatting to highlight trends: Use conditional formatting to highlight trends in your data. For example, you might use a color scale to show which cells have the highest or lowest values in a range.

Data Validation
Data validation is the process of ensuring that the data entered into a spreadsheet is accurate and consistent. Here are some best practices for using data validation in your spreadsheets:
- Use dropdown lists: Use dropdown lists to restrict the range of acceptable values in a cell. This helps prevent data entry errors and ensures consistency.
- Set up rules: Use rules to restrict the range of values that can be entered into a cell. For example, you might set up a rule that only allows whole numbers between 1 and 100 to be entered into a cell.
- Use messages: Use input/error messages to provide feedback to users when they enter data that doesn’t meet the validation criteria. This helps users understand what went wrong and how to correct the error.
Overall Look and Feel
The overall look and feel of your spreadsheet are important, as they can affect how easy it is to read and understand. Here are some best practices for creating a consistent and professional look and feel:
- Simple is beautiful: Use
- Use a consistent layout: Use a consistent layout for all the sheets in your spreadsheet. This makes it easy for users to navigate and find the information they need.
- Use a clear and readable font: Use a clear and readable font, such as Arial or Calibri, for the text in your spreadsheet. This makes it easy for users to read and understand the information.
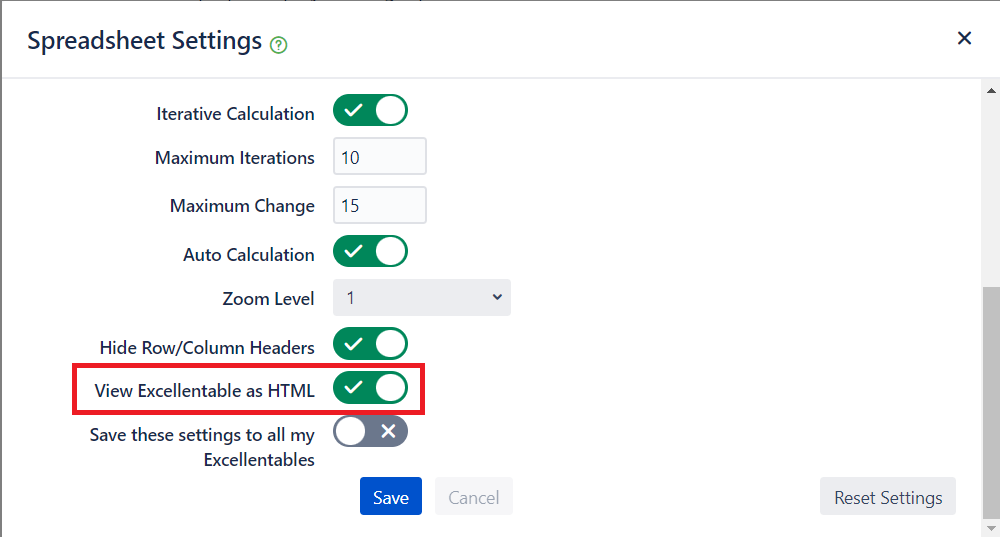
- Use native display: In smaller spreadsheets, you can use the native HTML display. It makes spreadsheets easier to read and navigate.
In conclusion, by following these best practices for planning, conditional formatting, data validation, and overall look and feel, you can create spreadsheets that are accurate, easy to read, and effective. Whether you’re using spreadsheets for personal or professional use, these tips can help you get the most out of your data.
Learn more about Excellentable, and start your 30-day trial today